Showing posts with label For the Home. Show all posts

Ruffles everywhere skirts and ironing board cover

A few weeks ago, right around my birthday, I won a Free Spirit giveaway and received SIX (6) yards of fabric. Yes, six whole yards. They were all from the "Katharine's Wheel" line by Nel Whatmore.
I almost never get several prints from one line, so I was super happy to have received this much matching fabric!

Here is what I made from it:
New skirts for the girls with LOTS of ruffles. These two skirts used up a total of 4 yards.


The skirt has two layers.


All is topped off with a cute fabric bow. I made them a bit longer so they  will last a couple of years.

And for me: a new ironing board cover. I followed Mandy's recommendations on how to make it. I used almost one yard of fabric for the board. Mine ended up being pieces together, but you can hardly see the seam.


So, that leaves one yard left over. I have no plans for it yet, so it goes into my stash. At least for a little while.

Crafting for fall

Where has the time gone???!!! Can't believe it's October already.
We have been very busy with school and sports activities. That left little time for sewing. However, while the boys were away this weekend, I squeezed in some crafting time with the girls.


My interchangeable wreath got a new look and our kitchen window some cute decoration.


The girls helped me with the felt leafs for the garland. They had fun sewing the leaves onto pieces of green felt and then cutting all the way around. Towards the end they were also cutting their own leaf shapes as well.

The center of our garland is a wood shape. Late in the summer I had bought oodles of different unfinished shapes and spray painted them with chalk board paint.

Then I used acrylic paint and outlined each of the shapes. They make great gift tags or name tags, too. My girls have one hanging on their lunch boxes, and I write down little messages each day.

Now, I am working on the kid's Halloween costumes. The girls' are almost done. However, Yanic wants to be a Wolverine! Wolverine, as in the ANIMAL! How am I going to pull this one off? Any ideas?

Summer Project - Stepping Stones

This type of project never gets old for our kids. I am sure most of you have done these before, but I just wanted to share a couple of things we have done a bit differently this time.

Most online how-to's tell you to use hardware store concrete mixes. Well, while this is fine, you basically need to put on a haz-mat-suit before you start. So, I searched around a little and found this art plaster at Joann's: It's non-toxic. I bought a 5 pound package. It costs about 9 dollars (compared to 2$ for a bag of concrete), but you can easily use one of your 40% or 50% off coupons, since I don't think this stuff ever goes on sale. The entire package was enough for 6 stepping stones (no left-overs). The biggest plus, but minus at the same time, is the time it takes this plaster to set. We had a pretty hot day and I think it took no more than 4 minutes and the material became too hard to push the decorations in. So, once you pour it you need to be very quick with decorating. But, your kids will have almost instant gratification!


We used two different kinds of disposable aluminum cake pans as molds. I really like the ones with the scalloped edges. Those came from Target.

For decorating we used LOTS of glitter, buttons, sea shells, marbles, beads. I have never used glitter before for stepping stones. As expected, not all the glitter stuck to the plaster and threatened to fall off. So, I simply sprayed two layers of clear coat on it.

The stepping stones look awesome, when the sun-light hits them. Super sparkly and shiny ;-)

Summer Project - Birdhouses

Wow, it's been quiet around here! I am so behind documenting what I have been working on over the past months and also catching up on the fun things happening on the blogs in my reader.

Also, for today I have not much, but just a quick and cute project suitable for a 100+ degree or rainy day.

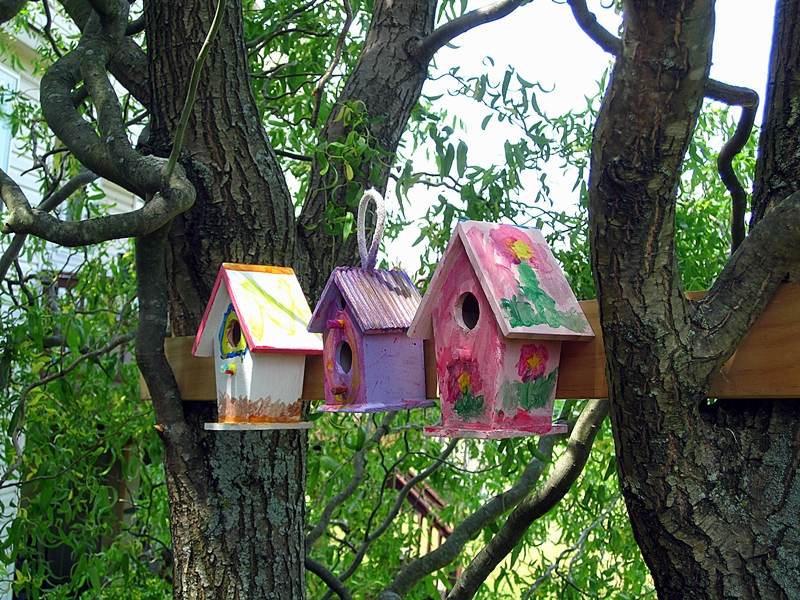
I let the kids pick their favorite 1$-Birdhouse at Joann's. They have at least 5 different kinds to chose from for 1$. They are not intended for birds to actually nest in them, but please don't tell my kids...;-)

We spray-painted ours with an indoor/outdoor paint first. Then the kids used regular washable kids paint to decorate theirs. After letting it dry I applied a clear coat, so they would be suitable for outdoors.

Once all this was done, I simply screwed all three onto a board and stuck the board into our corkscrew willow. Simple one of a kind decoration! And who knows, maybe some kind of creature will even make them their home ;-)

Adventures in paper piecing

At the beginning of the year I told myself I would try something new this year. It ended up being paper piecing.
I had seen this cute template at SMS the other week and thought this should be easy enough for a beginner. Well, yes and no. The lower portion, the cup, was fairly easy. But, the top gave me headaches and lot's of seam ripping. For the life of me, I could not figure out how to position the fabrics on an angle, so they would line up straight in the end. I know, sounds stupid, but those straws almost killed me....

Now, I have six cute 5 inch squares with fruity drinks on them and don't really know what to do with it.


Should I just make coasters?


Or a rectangular table topper?

Or this way?

Or a hexagon table topper like this? I guess on the inside it's a hexagon, but the outside would be a dodecagon (Yes, I had to google it.... ;-)).

Or maybe this way?

I can't really ask anybody at home, because they were looking at me like I am nuts making these useless things and all the while cussing them while sewing....

Can you help me?

Art Display

Straight up, this is not my idea, but unfortunately I cannot find the blog anymore where I saw this idea first.

The girls are bringing home artwork from school on a daily basis and I am having a hard time figuring out what to do with it: I can't keep EVERYTHING, right; and the fridge has barely any empty space anymore?!
So, we decided to make this interchangeable art display. All you need are a few supplies: paint chips from HD or Low's, a flower paper punch, a small hole punch, string, clothes pins and art work.

It's a nice project to make together with your kids. The girls had fun helping to punch out the flowers and then each "sewed" them onto the string by themselves.


Now, they get to chose which project to hang up and I don't have a counter full of "random" paper anymore.

Interchangeable Yarn Wreath

I cannot begin to tell you how happy I am, that I finally got around to taking down all our outside Christmas lights yesterday. I know! Can you believe it?! It's mid January, and we still have the lights up....

So, naturally, I wanted to show off my "new" ready-for-Valentines-day-front-door.


I made this pretty yarn wreath the other day. Best part about it, it's interchangeable.

Similar to the wreath in this tutorial, I sewed the flowers onto a piece of felt backed with a strip of velcro. However, instead of glueing, I sewed everything. We have the sun bearing down on our front door all afternoon, so it gets very hot between the screen door and front door. And with that anything glued tends to fall off sooner or later....


So, now I have to make "stick-ons" for Spring, Summer, Fall, Halloween, Thanksgiving, Christmas... I think, I can combine Spring and Summer, though, and maybe Fall and Thanksgiving, too. So, that leaves only 4 more.... Easy, peasy.

Beautification of an old dresser

I have started following the One-month-to-win-it blog. Every week the ladies have to come up with a craft for a specific theme. This past week the theme was Mod Podge. One entry particularly caught my eye: a revamped toy chest. It was such an easy way to make something old look new again.

Nine years ago we bought this cheapo dresser for our son's nursery. My "fab" idea back then was to cutify it with some moon-and-stars knobs. Yeah, that's how creative I can be! Don't be jealous. Four years ago this treasure was handed down to our girls and has been in their room ever since.


So, I felt, the time was right that something had to be done about it.
Three hours later, a few sheets of scrap booking paper and a bottle of mod podge, they now have a cute, pink, flowery dresser. Even the knobs became part of the transformation. 


I do like how it turned out, but think it would look prettier if the dresser was painted white. However, that would take too much energy on my part right now. Noticed that unsightly gap between the second and third drawers? Well, the bottom drawer is supposed to be the top drawer. I mixed them up. It's fixed now, though.


And, the lid of their toy chest received a little facelift, too.


Now, what else can I plaster with paper and mod podge....? ;-)

ART

Now, the post about the project that I have been so excited about!

A while back I saw a tutorial on Jessica's blog for transfering a black and white image onto a wooden plaque. I absolutely loved the idea of taking a photograph of the kids, using an imaging program to change it into a b&w picture, "posterize" it a bit and then turning it into a work of art. Art that will make great gifts for grandparents and great-grandparents.

Instead of the wooden plaque I opted for 8 x 10 artist canvas. And it worked out great. I have to mention, however, that my first attempt failed miserably: I plastered too much medium onto the canvas, did not let it dry completely, rubbed off half of the black image in the process, but not all the paper... It was just a total mess. So, I agree with Jessica, to make a few photocopies of your picture in case you screw up.

For the backgrounds I used three different acrylic paints (red, yellow, white and green, yellow, white). I used Golden Regular Gel Medium to transfer the images and also to seal it afterwards. There is a great tutorial on how to transfer the image at LilBlueBoo. I think the key for this project is to be patient and let your work dry completely between each step.

Come Christmas time, I think I will be making a few more of these.
Have a great week!

Doorway Puppet Theater

Lately, the girls' imaginations have been running wild and they are more and more into role-play type games. So, I thought it would be nice for them to have a puppet theater for their upcoming 3rd Birthday. However, I did not want to add another bulky piece of equipment that takes up a lot of space. And let's face it, some toys get old very quickly and just end up laying around collecting dust.
So, herewith, I present to you my doorway puppet theater! Easy to roll up and hide in a closet.

It's about 36" wide x 50" high and fits with a tension rod into any regular doorway. I used part of an old flannel sheet, some leftover vintage sheet for the curtains, lots of felt and chalk cloth for the clock and frameboard.

Originally, I was planning to put a tutorial together, but then totally forgot to take pictures of the process. Sorry. But, to get you started, here are the main measurments:
1. Theater pannel: cut a 55" x 38" rectangle, finish the lower edges and side edges. Create a "tunnel" up top that will fit a regular sized shower curtain rod. Our doors are 32" wide on the inside. So, if yours are wider you will have to add to the width of your pannel accordingly.
2. The window opening is about 24 inches from the ground and measures 18" wide x 16" high. On the inside at the bottom of the window I sewed a pocket to insert a dowel stick. This way the window will not be floppy when you hang the theater in the doorway.

The accessories I basically cut and sewed as I went along. Also, on the backside I added three pockets to hold various puppets. Puppets, that I still have to make (or buy...). The numbers on the clock and the writing on the board are applied freehand with fabric paint. Overall I am pretty happy with how it turned out. I may add a few more embellishments, like carnival masks, above the stage window later on.
This pic was supposed to show you the chalk pocket, but Blue jumped in to check out the theater.

Have a great week, everybody.

Thrifted Skirt Winner and a Valentine Craft

As Sunday was getting close I was starting to worry that nobody would leave a comment with the right answer. I mean, not that it would have really mattered, because I would have just picked a random winner then. But, then Saturday, somebody finally guessed it right!!!!

And, that somebody is                      Mari           !!!!!!!!!!!!!

She said: "Adorable...I'm going to say a bed skirt was used (the dust ruffle) or whatever they are called?? (but I'm international so not sure it counts?!)"  (Of course, it does!)


Congratulations! Yes, I used a cribsized Bedskirt. See!


On to a little craft I made yesterday. You may have seen this awesome tutorial floating around in Craft-Blogland over the past few days. I can only recommend it. It's easy and super "cost-conscious". I spent a whopping 1.17 USD (incl. tax) to make two!
One for the inside of our front door:


and one for the outside:


Very pretty, cute and quick.
I have so many more projects to share with you. Three to be exact. But, I will pace myself. See, I want to make sure you come back! ;-)

LinkWithin

Blog Widget by LinkWithin